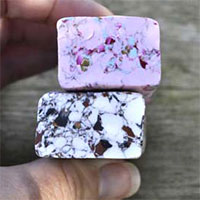
Faux Marble Polymer Clay Cane | FREE How To Video Tutorial
I was always fascinated with faux effects and granite / marble stones were definitely one of them.
Beautiful mineral stones weaved in veins and patterns – amazing!
I was determined to think of a way transform these patterns into a marble polymer clay cane.
The idea to use food processor as a mixing tool occured to me when I purchased a new one. At first it was just for mixing old clay into scrap sheets but then I thought it would be handy if I control the colors and amount of clay.
Luckily I have so many old clay packages as well as old millefiori canes, so I thought I’d give it a try.
There are many ways to create a faux marble effect, this is my version, I call it “Cane Rocks”.
So what are the ingredients?
I chose a single small pack of white old fimo clay (56 grams) and about 20-30 grams of millefiori canes.
The amount will determine the relations between the colors. A ratio of 1/3 to 1 is good when it comes to creating this effect.
IMPORTANT! You may use any clay of your choice (I had old “FIMO” and fresh “Premo” so I chose the old dry ones).
It is important that the clay will be dry. If the clay is too fresh the clay will mix into a scrap colour and won’t create the “marble effect”.
You are not limited to use millefiori canes only. Any clay color would work but the millefiori canes give an extra deep effect of colors inside the marble cane which add quality and realistic effect to the final result.
As for the food processor – I am using my old “moulinex” machine, it’s about 20 years old (I got it when I got married!)
The bowl is made of plastic so it is better to spray it with baby oil to make leftovers scraping easier and leaving as little clay on the plastic as possible.
You will see the spray in my 2nd demo (I forgot to do it with the first cane).
If you do have leftovers clay on the plastic bowl make sure you clean it as soon as possible so it won’t cause any chemical reaction with it.
Don’t have a food processor?
You can definitely cut your clay small and do the same chopping but it will probably take more time.
Enjoy the demo of my CANE ROCKS!
For the beads and final earrings I layered a background sheet and placed slices on top to form a unified sheet.
I used a roller to flatten and attach both layers together.
A cutter was used to form the bead shape.
Each bead was baked and coated with clear resin to create shiny marble look.
The holes were drilled after baking.
Here are close up photos of the canes, beads and jewellery –
I hope you liked this short demo and would love to see your marble cane rocks! Thank you for watching!
:)
Iris
16 comments
Trackbacks and pingbacks
-
Polymer Clay Faux Marble – Polymer Clay
[…] as pieces where marble would be convincing – insets for vanity items, some jewellery. This video tutorial is from…


I love this! Thanks so much, Iris!
You’re most welcome! 😊❤️
I tun 45 this month as well. So happy 🎉 birthday…and thanks for the great tutorial..
Happy birthday to you too Kelli! :) I hope you have a great one! wishing you all the best <3
non riesco a vedere il video tutorial..cosa devo fare?
I can’t see the video tutorial….how can I do?
Maybe try waiting for it to load completely and then play it? It’s also on youtube on my channel – https://www.youtube.com/user/polypediaonlineTV :)
thank you :D :* <3
How many of us have a birthday this month. My 65th is on the 14th Nov. Happy birthday all of us clay addicts. X
ha ha! November people rock! thank you Chrissy! <3
Hey my birthday is the 14th too! It’s funny how everything old is new again, I have been using my food processor for a marbled effect, to condition my clay and to mix colors for 20 years!
Thank you so much for that tip with the spray of baby oil into the food processor.. i too at first did not spray mine so the clay reacted with the plastic .. the I started using Armarol but I think the baby oil will work much better..how can you do this if you don’t have any crumbling clay??
Thank you for sharing. Can’t wait to try this!
Thanks for the great video!
I have developed a technique to make “polymer opals”. I end up with a huge number of 1 mm pieces of “opal’ clay that need to come together into a cane.
I use a black rubber mallet to smash the mass of tiny pieces into a roundish flat sheet, then, using the mallet, reshape it into a rectangular cane, like the ones you make.
It is very important to clean the ends of the rubber mallet between canes, as some of the clay sticks to the mallet.
I use an ammonia based window cleaner to do this. It dissolves all traces of the clay on the black rubber mallet.
Thank you Susan! Sounds like a wonderful idea!
❤️ Iris